A Simple Guide to Utilizing an EVM Wallet Without a Galaxy ID
Are you interested in using an EVM wallet without a Galxe ID? Look no further! This simple guide will walk you through the steps to get started.
An EVM wallet, or Ethereum Virtual Machine wallet, is a tool that allows you to store, manage, and transact with Ethereum-based tokens. It provides a secure and convenient way to interact with the Ethereum blockchain without needing a Galxe ID.
Why would you want to use an EVM wallet without a Galxe ID? There could be several reasons. Perhaps you don’t have a Galxe ID, or you simply prefer to keep your financial transactions private. Whatever the case may be, we’ve got you covered.
So, let’s dive in and learn how to use an EVM wallet without a Galxe ID. The first step is to choose a wallet provider that supports this feature. Some popular options include MetaMask and MyEtherWallet. Once you’ve selected a provider, you’ll need to create a new wallet.
After creating your wallet, you’ll be given a unique wallet address. This address is similar to a bank account number and will be used to send and receive funds. It’s important to keep this address secure and share it only with trusted individuals or platforms.
A Beginner’s Guide to an EVM Wallet Setup Without Galxe ID
If you’re new to the world of cryptocurrency and want to start using an EVM wallet but don’t have a Galxe ID, don’t worry! This guide will walk you through the process step by step.
1. Choose an EVM wallet: There are several EVM wallets available in the market, such as MetaMask, MyEtherWallet, and Trust Wallet. Research and choose the one that suits your needs.
2. Download and install the wallet: Once you’ve decided on a wallet, visit the official website or download it from a trusted source. Follow the instructions to install the wallet on your device.
3. Create a new wallet: Open the wallet application and look for the “Create New Wallet” or “New Account” option. Click on it to start the wallet setup process.
4. Set a strong password: It’s crucial to choose a strong password to protect your wallet. Use a combination of uppercase and lowercase letters, numbers, and special characters to make it secure.
5. Save the recovery phrase: During the wallet setup, you will be given a recovery phrase or seed phrase. This phrase is essential for restoring your wallet in case you lose access to your device. Write it down and keep it safe.
6. Confirm the recovery phrase: To ensure you’ve correctly written down the recovery phrase, most wallets will ask you to confirm it by selecting words in the correct order. This step is crucial for wallet security.
7. Backup your wallet: Most wallets will provide an option to download a backup file. Save this file on a secure external storage or cloud service. It will come in handy if you need to restore your wallet later.
8. Connect your wallet to the Ethereum network: Once your wallet setup is complete, you’ll need to connect it to the Ethereum network. Look for the network settings option and select the appropriate network (e.g., Ethereum Mainnet, Ropsten, or Rinkeby).
9. Receive and send tokens: Congratulations! Your EVM wallet setup is now complete. You can now receive tokens by sharing your wallet address with others. To send tokens, click on the “Send” or “Send Transaction” option and follow the instructions.
Remember, always double-check the recipient address and transaction details before sending any tokens. Keep your wallet software up to date and be cautious of phishing attempts.
That’s it – you’re now ready to start using your EVM wallet without a Galxe ID. Happy transacting!
Why Use an EVM Wallet?
An EVM (Ethereum Virtual Machine) wallet is a crucial tool for anyone involved in the world of Ethereum and decentralized applications (DApps). It provides users with a secure and convenient way to store, manage, and interact with their Ether (ETH) and other Ethereum-based assets.
Here are several reasons why using an EVM wallet is beneficial:
Security
One of the primary reasons to use an EVM wallet is security. By storing your assets in an EVM wallet, you gain control over your private keys, which are necessary for accessing and managing your funds. This means that you don’t have to rely on third parties to safeguard your assets, reducing the risk of hacking and theft.
Convenience
An EVM wallet offers convenience and accessibility. With an EVM wallet, you can easily send, receive, and store Ether and other Ethereum-based tokens. You can manage your assets from anywhere in the world, as long as you have an internet connection. Additionally, many EVM wallets provide user-friendly interfaces that make it simple to navigate and interact with the Ethereum network.
Interoperability
EVM wallets are designed to support interoperability with various decentralized applications built on the Ethereum blockchain. This means that you can seamlessly use your EVM wallet to interact with different DApps, such as decentralized exchanges, lending platforms, and decentralized finance (DeFi) protocols. By using an EVM wallet, you can unlock the full potential of the Ethereum ecosystem.
In conclusion, using an EVM wallet is essential for anyone who wants to fully participate in the Ethereum ecosystem. It provides security, convenience, and interoperability, allowing users to securely store and manage their assets and interact with decentralized applications.
Setting Up an EVM Wallet
An EVM wallet is an essential tool for interacting with the Ethereum Virtual Machine (EVM) and managing your digital assets on the Ethereum network. Setting up an EVM wallet is a straightforward process that requires just a few simple steps. Here’s a guide to help you get started:
Step 1: Choose a Wallet
The first step in setting up an EVM wallet is to choose the right wallet for your needs. There are several options available, including:
- MetaMask: A popular browser extension wallet that allows you to interact with the Ethereum network directly from your browser.
- MyEtherWallet: An online wallet that allows you to generate and manage Ethereum wallets securely.
- Trust Wallet: A mobile wallet that offers a simple and secure way to manage your Ethereum and other ERC-20 tokens.
Research the features and security measures of each wallet to determine which one best suits your requirements.
Step 2: Download and Install the Wallet
Once you’ve chosen a wallet, visit the official website or app store to download and install it on your device. The installation process is usually straightforward and similar to installing any other application.
Step 3: Create a New Wallet
After installing the wallet, open the application and follow the prompts to create a new wallet. This typically involves setting a strong password and backing up your wallet using a recovery phrase or mnemonic seed.
Step 4: Secure Your Wallet
To ensure the security of your EVM wallet, it’s essential to take some additional steps:
- Enable two-factor authentication: Enable two-factor authentication on your wallet to add an extra layer of security.
- Keep your recovery phrase safe: Write down your recovery phrase and store it in a safe place. This phrase is crucial for recovering your wallet if you lose access to your device or forget your password.
- Enable notifications: Configure your wallet to send you notifications for any important activities, such as transactions or account changes.
- Update your wallet regularly: Ensure that you are using the latest version of your wallet software to benefit from any security improvements and bug fixes.
By following these measures, you can enhance the security of your EVM wallet and protect your digital assets.
Step 5: Set Up Your Wallet Preferences
Once your wallet is secure, you can customize its preferences according to your requirements. This may include selecting a preferred currency, adjusting transaction fees, or enabling specific features.
With your EVM wallet set up, you are now ready to start using it to interact with the Ethereum network, send and receive funds, and explore the wide range of decentralized applications (dApps) available.
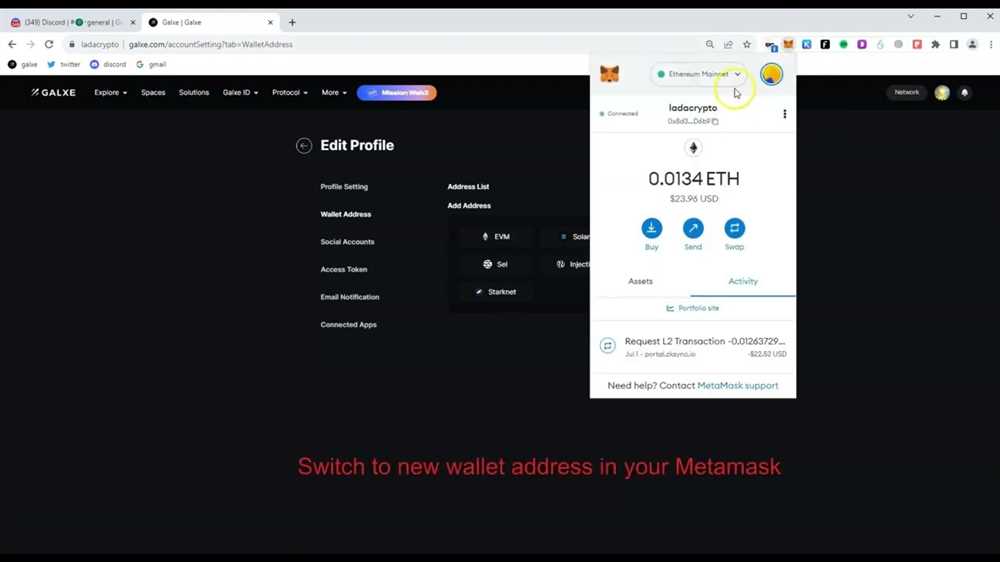
Using an EVM Wallet Without Galxe ID

If you don’t have a Galxe ID, you can still use an EVM wallet to manage your Ethereum-based assets. Here’s a simple guide on how to do it:
Step 1: Choose an EVM Wallet
There are several EVM wallets available in the market that don’t require a Galxe ID. Some popular options include MetaMask, Trust Wallet, and MyEtherWallet. Choose the wallet that suits your needs and install it on your device.
Step 2: Create a New Wallet
Once you have installed the EVM wallet, open it and select the option to create a new wallet. You will be prompted to set a strong password. Make sure to use a unique and secure password to protect your funds.
Step 3: Securely Store Your Recovery Phrase
After creating a new wallet, you will be given a recovery phrase or seed phrase. This phrase is crucial for recovering your wallet in case you lose access to your device or forget your password. Write down the recovery phrase on a piece of paper and store it in a safe place.
Step 4: Access Your Wallet
Once your wallet is created and the recovery phrase is safely stored, you can access your wallet anytime by entering your password. Some wallets may also require you to enter the recovery phrase to verify your ownership.
Step 5: Manage Your Assets
With your EVM wallet, you can now manage your Ethereum-based assets. You can send and receive ETH and ERC20 tokens, view your transaction history, and interact with decentralized applications (dApps).
Note: Without a Galxe ID, you may have limited access to certain features and services that require Galxe ID authentication. However, you can still perform basic wallet operations and interact with the Ethereum network through your EVM wallet.
Remember to always keep your wallet and recovery phrase secure. Avoid sharing your recovery phrase with anyone and be cautious of phishing attempts or malicious websites.
Happy wallet management!
Security Measures for EVM Wallets
When it comes to using an EVM wallet, security should be a top priority. Here are some important security measures to keep in mind:
| 1. Choose a Strong Password |
|---|
| Creating a strong and unique password is the first line of defense for your EVM wallet. Avoid using common phrases or easily guessable passwords. Include a mix of upper and lower case letters, numbers, and special characters. |
| 2. Enable Two-Factor Authentication |
| Two-factor authentication adds an extra layer of security to your EVM wallet. By enabling this feature, you will need to provide an additional code or authentication method, such as a fingerprint or SMS code, to access your wallet. |
| 3. Backup Your Wallet |
| Regularly backing up your EVM wallet is crucial in case of device loss, damage, or theft. Keep your backup in a secure location, such as an encrypted hard drive or a hardware wallet. |
| 4. Update Your Software |
| Keeping your EVM wallet software up to date is important for security. Developers often release updates that include bug fixes and security patches. Make sure to install these updates as soon as they become available. |
| 5. Be Wary of Phishing Attempts |
| Phishing attacks are common in the cryptocurrency space. Be cautious of suspicious emails, links, or messages that request your wallet information. Always verify the source before providing any sensitive information. |
| 6. Use Hardware Wallets |
| If you hold a significant amount of funds, consider using a hardware wallet. Hardware wallets store your private keys offline, minimizing the risk of online attacks. They provide an extra layer of security and peace of mind. |
| 7. Use Trusted Wallet Providers |
| When choosing an EVM wallet provider, opt for trusted and reputable companies or projects. Research their security features and track record to ensure the safety of your funds. |
By implementing these security measures, you can greatly reduce the risk of unauthorized access and protect your EVM wallet and funds.
What is an EVM Wallet?
An EVM (Ethereum Virtual Machine) wallet is a digital wallet that allows users to store, send, and receive Ethereum and other Ethereum-based tokens.
Why would I want to use an EVM wallet without a Galxe ID?
Using an EVM wallet without a Galxe ID provides users with a greater level of privacy and anonymity. With a Galxe ID, your transactions can be easily traced back to you, while using a wallet without a Galxe ID allows for more secure and private transactions.