Adding a Secondary EVM Wallet to Your Galxe ID: A Step-by-Step Guide
Your Galxe ID is your gateway to the world of decentralized finance. It allows you to securely manage your assets and interact with various blockchain networks. One of the key features of Galxe ID is the ability to add secondary EVM (Ethereum Virtual Machine) wallets.
Adding a secondary EVM wallet to your Galxe ID is a simple process that can greatly enhance your DeFi experience. With a secondary wallet, you can easily switch between different blockchain networks, access dApps, and securely store your digital assets.
To add a secondary EVM wallet to your Galxe ID, follow these step-by-step instructions:
- Launch your Galxe ID – Open the Galxe ID app on your device and enter your secure login credentials.
- Navigate to Wallet Settings – Once you are logged in, go to the settings menu of your Galxe ID app and select “Wallet Settings”.
- Select “Add Wallet” – In the Wallet Settings menu, you will find an option to add a new wallet. Click on this option to proceed.
- Choose EVM Wallet – From the list of wallet options, select “EVM Wallet” as your desired type of wallet.
- Follow the Setup Wizard – Galxe ID will guide you through a setup wizard for adding a secondary EVM wallet. Follow the on-screen instructions and provide the necessary information, such as wallet name and password.
- Confirm and Save – Review the details of your new EVM wallet and confirm to proceed with the setup. Once you have confirmed, your new wallet will be added to your Galxe ID.
That’s it! You have successfully added a secondary EVM wallet to your Galxe ID. You can now enjoy the benefits of managing multiple wallets within a single app, giving you more flexibility and control over your DeFi activities.
Note: Adding a secondary EVM wallet to your Galxe ID does not affect your primary wallet and its associated assets. Each wallet operates independently within the Galxe ID app.
Start exploring the world of decentralized finance today by adding a secondary EVM wallet to your Galxe ID. Expand your possibilities and unlock the full potential of blockchain technology!
Step-by-Step Guide: Adding Secondary EVM Wallet to Galxe ID
If you are looking to add a secondary EVM wallet to your Galxe ID, this step-by-step guide will walk you through the process.
Step 1: Accessing Your Galxe ID Settings
First, log in to your Galxe ID account and navigate to the settings page. Look for the “Wallets” section and click on “Add New Wallet.”
Step 2: Selecting EVM Wallet
In the wallet selection menu, choose the option for an EVM wallet. The secondary wallet will be used for managing Ethereum-based tokens.
Step 3: Connecting Wallet
Now, you will need to connect your secondary wallet to your Galxe ID. This can typically be done through a browser extension or a mobile app.
Step 4: Verify Wallet Connection
After connecting your secondary EVM wallet, you will be prompted to verify the connection. Follow the instructions provided by your wallet provider to complete this process.
Step 5: Set Default Wallet
Once your secondary EVM wallet is successfully connected, you can choose it as your default wallet for EVM-based transactions. This can usually be done through the Galxe ID settings page.
By following these steps, you can easily add a secondary EVM wallet to your Galxe ID and expand your options for managing Ethereum-based assets. Make sure to keep your wallet secure and backup your recovery phrase in a safe place.
Choose the Wallet
In order to add a secondary EVM wallet to your Galxe ID, you will need to choose a suitable wallet that is compatible with the Ethereum Virtual Machine (EVM) environment. There are several popular wallets available that support EVM functionality.
MetaMask
MetaMask is one of the most popular and widely used EVM wallets. It is a browser extension wallet that allows you to interact with decentralized applications (dApps) on the Ethereum network. MetaMask is known for its user-friendly interface and easy setup process.
To add your MetaMask wallet:
- Install the MetaMask extension on your preferred web browser.
- Create a new wallet or import an existing wallet using your seed phrase or private key.
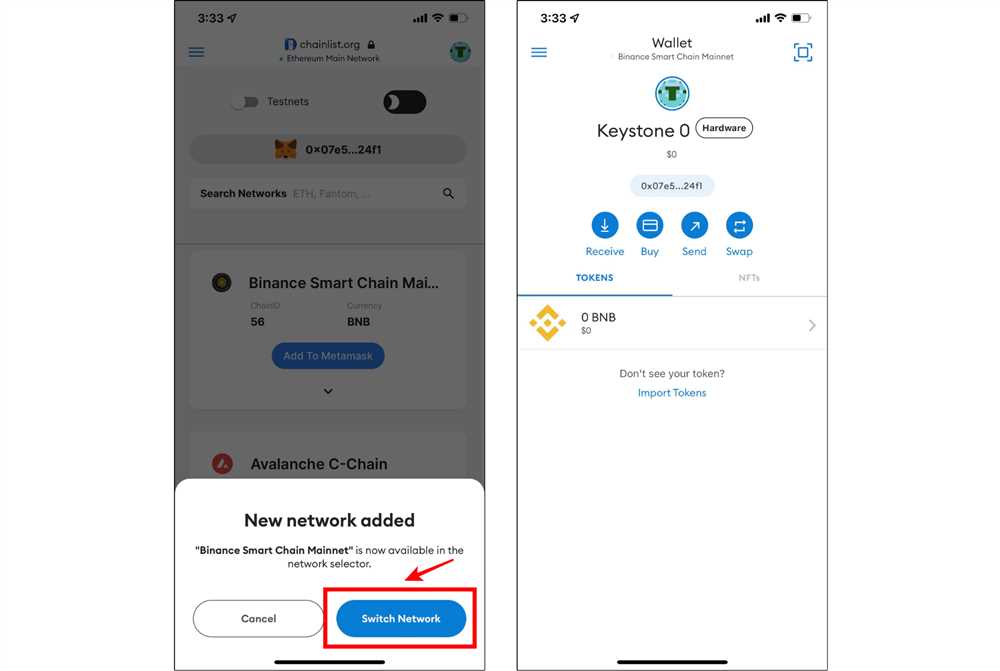
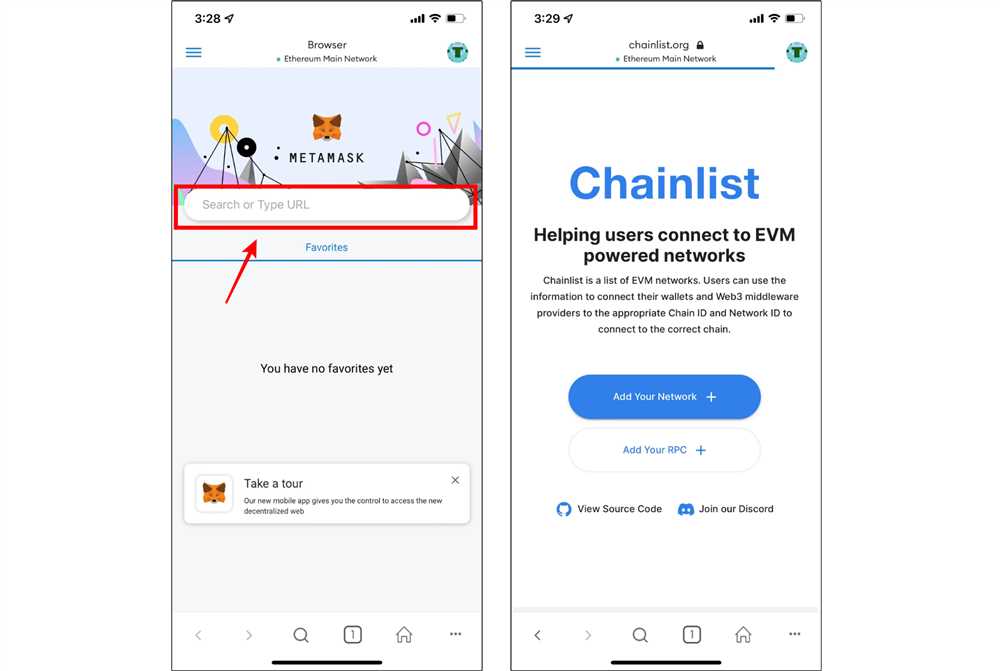
- Connect your wallet to the Galxe ID platform by clicking on the network dropdown in the MetaMask extension and selecting the desired network (e.g., Ethereum Mainnet).
- Click on the account avatar in the MetaMask extension and copy your wallet’s address.
- Go back to the Galxe ID platform and enter your wallet’s address to add it as a secondary EVM wallet.
MyEtherWallet
MyEtherWallet (MEW) is another popular EVM wallet that provides a user-friendly interface for accessing the Ethereum network. It allows you to create and manage multiple wallets, as well as interact with various decentralized applications.
To add your MyEtherWallet:
- Go to the MyEtherWallet website and select the “Create a New Wallet” option.
- Create a new wallet by following the step-by-step instructions provided on the MEW website.
- Once your wallet is created, access it by selecting the “Access My Wallet” option and enter your password.
- Click on the “View Wallet Info” option to access your wallet’s address.
- Copy your wallet’s address and return to the Galxe ID platform to add it as a secondary EVM wallet.
Remember to always exercise caution when choosing a wallet and ensure that you are using the official and reputable versions of these wallets. It is also recommended to store your wallet’s seed phrase or private key in a secure location to prevent unauthorized access to your funds.
Connect Wallet to Galxe ID
Adding a secondary EVM wallet to your Galxe ID is a straightforward process. Follow the steps below to connect your wallet:
Step 1: Open Galxe ID
First, open the Galxe ID platform on your preferred web browser.
Step 2: Log in to Galxe ID
Log in to your Galxe ID account using your credentials.
Step 3: Access Wallet Settings
Once logged in, navigate to your account settings or profile settings. Look for the option to manage your wallets or connect a new wallet.
Step 4: Choose Add Wallet
Select the option to add a new wallet. This will prompt you to choose the type of wallet you want to connect.
Step 5: Select EVM Wallet
Choose the option for an EVM wallet. This could include popular wallets like MetaMask or Trust Wallet.
Step 6: Connect Wallet
Follow the prompts to connect your EVM wallet. This usually involves clicking a connect button and approving the connection in your wallet app.
Step 7: Confirm Connection
Once connected, Galxe ID will display your wallet address and ask you to confirm the connection. Verify that the address matches the one in your EVM wallet before confirming.
Step 8: Wallet Connected
After confirming the connection, your EVM wallet will be successfully connected to your Galxe ID. You can now use it for various blockchain operations within the platform.
It’s important to note that the specific steps might vary depending on the Galxe ID platform and the type of EVM wallet you are using. However, the overall process should be similar. Always double-check the instructions provided by Galxe ID or your wallet provider for any specific guidance.
Verify and Sync Wallet

Once you have added a secondary EVM wallet to your Galxe ID, it is important to verify and sync the wallet to ensure that it is correctly connected and functioning properly.
To verify and sync your wallet, follow these steps:
| Step 1: | Open your secondary EVM wallet on your device or computer. |
| Step 2: | Login to your Galxe ID and go to the settings menu. |
| Step 3: | Select the option to manage connected wallets. |
| Step 4: | Locate your secondary EVM wallet in the list of connected wallets and click on it. |
| Step 5: | Click on the option to verify and sync the wallet. |
| Step 6: | Follow the on-screen instructions to complete the verification process. |
During the verification process, you may be asked to provide additional information or perform certain actions to prove ownership of the wallet.
Once the verification process is complete, your secondary EVM wallet will be synced with your Galxe ID. You will be able to view and manage your wallet from within the Galxe ID interface.
It is important to regularly verify and sync your wallet to ensure that it remains connected and functional. This will help to prevent any potential issues or discrepancies with your wallet and ensure a smooth user experience.
Start Using Secondary EVM Wallet with Galxe ID
Once you have successfully added a secondary EVM wallet to your Galxe ID, you can start using it for various purposes. Here is a step-by-step guide on how to get started:
| Step 1: | Open the Galxe ID application on your device and navigate to the wallet section. |
| Step 2: | Select the secondary EVM wallet that you have added from the list of available wallets. |
| Step 3: | Once you are in the secondary EVM wallet, you can view your balance, transaction history, and other wallet details. |
| Step 4: | To send or receive funds using the secondary EVM wallet, click on the respective options provided in the wallet interface. |
| Step 5: | If you want to switch back to your primary EVM wallet, simply navigate back to the wallet section and select the primary wallet. |
By following these simple steps, you can easily start using your secondary EVM wallet with your Galxe ID. Make sure to keep your wallets secure and always verify the addresses before making any transactions.
Why would I need to add a secondary EVM wallet to my Galxe ID?
Adding a secondary EVM wallet to your Galxe ID provides you with additional security and flexibility for managing your digital assets. It allows you to store and access your cryptocurrencies and tokens from multiple wallets, reducing the risk of losing funds in case one wallet gets compromised or inaccessible.
Can I add multiple secondary EVM wallets to my Galxe ID?
Yes, you can add multiple secondary EVM wallets to your Galxe ID. This allows you to have even more flexibility and security in managing your digital assets. Simply repeat the steps mentioned earlier for adding a secondary wallet each time you want to add another one. Just make sure to keep track of all your wallet addresses and necessary authentication information for easy access to all your wallets.