
How to Add a Wallet to a Different Network on Galxe
Adding a wallet to a new network can be a daunting task, especially when it comes to security. Galxe, the revolutionary blockchain platform, offers a secure solution for this process. In this article, we will explore how to securely add a wallet to a new network on Galxe.
First and foremost, it is important to choose a strong and unique password for your wallet. This will help protect your funds from unauthorized access. Make sure to use a combination of uppercase and lowercase letters, numbers, and special characters. Additionally, avoid using common phrases or personal information that could be easily guessed.
In order to securely add your wallet to a new network on Galxe, it is recommended to use a hardware wallet. A hardware wallet is a physical device that stores your private keys offline, providing an extra layer of security. By keeping your private keys offline, you reduce the risk of them being compromised by hackers or malware.
Once you have a hardware wallet, the next step is to connect it to your computer or mobile device. Make sure to use a secure and trusted connection, such as a USB cable or Bluetooth. Avoid using public Wi-Fi or other unsecured networks, as they can potentially expose your private keys to hackers.
After connecting your hardware wallet, you will need to download the Galxe wallet application. This application will allow you to access and manage your funds on the Galxe network. Make sure to download the application from the official Galxe website or a trusted source to avoid downloading malware or fake wallets that could steal your funds.
How to securely add a wallet to a new network on Galxe
When adding a wallet to a new network on Galxe, it is important to take certain steps to ensure the security of your funds. Here is a step-by-step guide on how to securely add a wallet to a new network:
Step 1: Verify the Network
Before adding your wallet to a new network, make sure to verify that the network is legitimate and trustworthy. Check the official Galxe website or other reliable sources to confirm that the network you are connecting your wallet to is authentic.
Step 2: Create a Strong Password
When adding your wallet to a new network, it is crucial to create a strong and unique password. Avoid using common or easily guessable passwords, and consider using a combination of numbers, letters, and special characters. This will help protect your wallet from unauthorized access.
Step 3: Enable Two-Factor Authentication
To enhance the security of your wallet, enable two-factor authentication. This will require you to provide an additional verification code, usually sent to your mobile device, whenever you want to access your wallet. Two-factor authentication adds an extra layer of security and helps prevent unauthorized access to your funds.
Step 4: Backup Your Wallet
Prior to adding your wallet to a new network, it is essential to backup your wallet. Create a backup of your wallet’s private keys or mnemonic phrase and store it in a secure location. This will allow you to recover your funds in case of loss or theft.
Step 5: Use a Secure Network Connection

When connecting your wallet to a new network, make sure to use a secure and trusted network connection. Avoid using public or unsecured Wi-Fi networks, as they can potentially expose your wallet to security risks. Opt for a private and encrypted network connection to protect your wallet and its contents.
Step 6: Monitor Your Wallet
Once your wallet is added to a new network, regularly monitor its activity and keep an eye out for any suspicious transactions. If you notice any unauthorized or unusual transactions, take immediate action to safeguard your funds. Stay vigilant and keep your wallet updated with the latest security patches.
| Summary |
|---|
| Adding a wallet to a new network on Galxe requires taking necessary security measures. Verify the network’s authenticity, create a strong password, enable two-factor authentication, backup your wallet, use a secure network connection, and monitor your wallet for any suspicious activity. By following these steps, you can securely add your wallet to a new network on Galxe and ensure the safety of your funds. |
Importing your wallet to Galxe
When setting up a new network on Galxe, it is crucial to securely import your wallet to ensure the safety and accessibility of your funds. Here’s a step-by-step guide on how to import your wallet to Galxe:
Step 1: Create a backup
Before starting the import process, it is highly recommended to create a backup of your wallet. This will allow you to restore your funds in case anything goes wrong during the import process.
Note: Make sure to store the backup in a secure location and keep it separate from your computer.
Step 2: Access the Wallet Import page
Log in to your Galxe account and navigate to the Wallet Import page. This can usually be found in the account settings or wallet management section.
Step 3: Choose the network
Select the network you wish to import your wallet to. Galxe supports a wide range of networks, so make sure to choose the correct one.
Step 4: Enter your wallet information

Enter the required information to import your wallet, which may include your wallet address, private key, or seed phrase. Make sure to double-check the information before proceeding.
Note: Be cautious when entering your wallet information and ensure that you are using a secure and trusted source.
Step 5: Verify and confirm
Once you have entered the wallet information, carefully review the details and verify that everything is correct. Any mistakes or typos could result in the loss of funds.
Note: Do not share your wallet information with anyone and be cautious of phishing attempts.
Step 6: Complete the import process
After verifying the details, click the “Import” or “Confirm” button to initiate the import process. The system will verify the wallet information and import your wallet to the chosen network.
Note: The import process may take some time depending on the network and the size of your wallet.
Congratulations! You have successfully imported your wallet to Galxe. You can now securely manage your funds on the new network and take advantage of all the features and benefits it offers.
Connecting your wallet to a new network
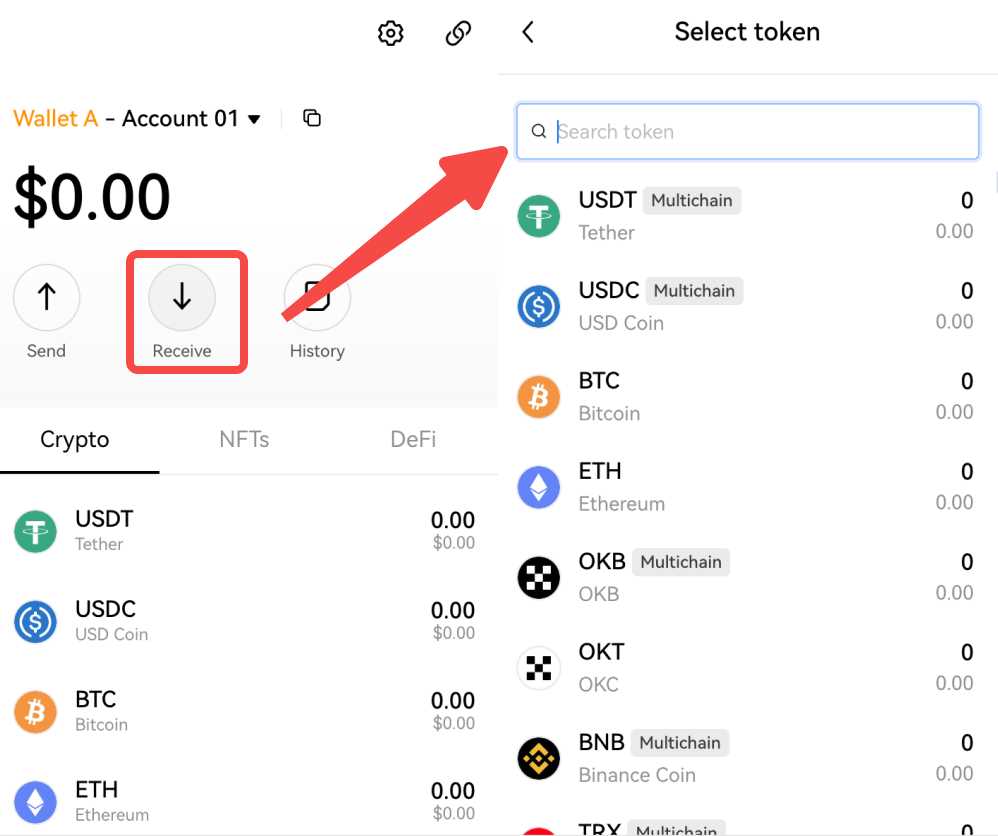
When it comes to using a digital wallet on Galxe, one of the key steps is connecting it to a network. Here’s how you can securely add a wallet to a new network:
- Open your digital wallet app or software.
- Navigate to the settings or options menu.
- Look for the “Networks” or “Network Settings” section.
- Select “Add Network” or a similar option.
- Enter the necessary details for the new network, such as the network name, URL, or other required information.
- Make sure to double-check the network details to ensure accuracy.
- Click “Save” or “Add” to connect your wallet to the new network.
- Depending on the wallet software, you may be asked to confirm the network connection with a transaction or by verifying your identity.
- Once connected, your wallet will be able to interact with the new network, such as sending and receiving funds or accessing decentralized applications (dApps) specific to that network.
It’s important to note that connecting your wallet to a new network requires caution and attention to detail. Always verify the authenticity of the network you are connecting to before entering any sensitive information or confirming a connection.
By following the above steps, you can securely add your wallet to a new network on Galxe and enjoy the benefits of using decentralized applications and interacting with different blockchains.
Ensuring secure network connection
When adding a wallet to a new network on Galxe, it is crucial to ensure a secure network connection. This is necessary to maintain the confidentiality and integrity of the wallet and its transactions. Here are some important measures to take to ensure a secure network connection:
| 1. Use a trusted network: |
| Always connect to the network using a trusted and secure Wi-Fi or wired connection. Avoid using public Wi-Fi networks or unsecured connections which can leave your wallet vulnerable to attacks. |
| 2. Update your wallet software: |
| Regularly update your wallet software to ensure that you have the latest security patches and fixes. Developers often release updates to address vulnerabilities and improve the overall security of the wallet. |
| 3. Verify network authenticity: |
| Before connecting your wallet to a new network, verify the authenticity of the network. Ensure that it is the legitimate network you intend to connect to and not a malicious imposter. Be cautious of phishing attacks or fake networks designed to steal your wallet information. |
| 4. Enable firewall and antivirus: |
| Enable a firewall and install reliable antivirus software on your device. These security measures can help protect your wallet from unauthorized access and malware attacks. |
| 5. Use strong, unique passwords: |
| Create strong and unique passwords for your wallet and network. Avoid using common or easily guessable passwords that can be easily cracked by hackers. Consider using a password manager to securely store and generate strong passwords. |
| 6. Encrypt your wallet: |
| Encrypt your wallet to add an extra layer of security. Encryption can protect your wallet and its private keys from unauthorized access in case your device is lost or stolen. |
By following these secure network connection practices, you can ensure the safety and privacy of your wallet while using Galxe.
Verifying wallet integration and security

Integrating a wallet with a new network on Galxe requires careful attention to security to ensure the safety of your funds and personal information. Here are some steps you should take to verify the wallet integration and enhance the security of your wallet:
1. Check the wallet’s source code
Before adding a wallet to a new network, it is crucial to review the source code of the wallet. Ensure that the code is open-source and has been thoroughly audited by reputable security experts. This step helps to identify any potential vulnerabilities or backdoors that could compromise the security of your wallet.
2. Verify the wallet’s encryption features

When adding a wallet to a new network, it is essential to confirm that the wallet supports robust encryption methods. Encryption helps protect your private keys and transaction data from unauthorized access. Look for wallets that implement strong encryption protocols, such as AES-256, to ensure the highest level of security.
3. Connect to the network through secure channels
When integrating a wallet with a new network, it is crucial to use secure channels for communication. Ensure that the network uses protocols like HTTPS or SSL/TLS to encrypt data transmission. Additionally, avoid connecting to public Wi-Fi networks or untrusted internet connections, as they may pose security risks.
4. Enable two-factor authentication (2FA)
Enabling two-factor authentication adds an extra layer of security to your wallet. By requiring an additional verification step, such as a unique code sent to your mobile device, it significantly reduces the risk of unauthorized access to your wallet. Make sure to enable 2FA whenever possible to enhance the security of your wallet.
In conclusion, the process of adding a wallet to a new network on Galxe should prioritize security. By reviewing the wallet’s source code, verifying its encryption features, connecting through secure channels, and enabling two-factor authentication, you can ensure the integration and security of your wallet.
What is Galxe?
Galxe is a decentralized network that allows users to securely add their wallets to the network and conduct transactions in a secure manner.
Can I add multiple wallets to Galxe?
Yes, you can add multiple wallets to Galxe. However, it is important to ensure that each wallet is properly secured and that you follow the necessary steps to add them securely to the network.
Is it possible to remove a wallet from Galxe?
Yes, you can remove a wallet from Galxe if you no longer wish to use it on the network. However, it is recommended to transfer any funds or assets from the wallet before removing it to avoid any potential losses. Simply follow the instructions provided by Galxe to remove your wallet from the network securely.