
Step-by-Step Guide Adding a Secondary EVM Wallet through Galxe ID
Are you looking to add an additional EVM wallet to your Galxe ID account? Here’s a step-by-step guide to help you through the process.
Step 1: Log in to your Galxe ID account. If you don’t have one yet, you can easily create a new account by following the simple registration process.
Step 2: Once logged in, navigate to the “Wallet” section in your account settings.
Step 3: In the “Wallet” section, you will see an option to “Add New Wallet.” Click on that option to proceed.
Note: Make sure you have the necessary details handy for the wallet you want to add, including the wallet address and any additional information required for the setup.
Step 4: Fill in the required details for your new wallet in the provided fields. This may include the wallet address, a unique name for the wallet, and any additional information as per the wallet’s requirements.
Step 5: Once you have filled in the details, click on the “Add Wallet” button to save your new wallet to your Galxe ID account.
Step 6: Congratulations! You have successfully added a secondary EVM wallet to your Galxe ID account. You can now easily manage multiple wallets through your Galxe ID interface.
Adding a secondary EVM wallet through Galxe ID allows you to conveniently access and control multiple wallets from a single platform. Whether you need separate wallets for different purposes or simply want to keep your funds organized, Galxe ID provides a user-friendly solution to meet your needs.
The Process of Adding a Secondary EVM Wallet through Galxe ID
Adding a secondary EVM wallet through Galxe ID is a simple and straightforward process. With Galxe ID, you can easily manage multiple wallets and seamlessly switch between them. Here is a step-by-step guide on how to add a secondary EVM wallet through Galxe ID:
Step 1: Open Galxe ID
To get started, open the Galxe ID application on your device. If you haven’t downloaded it yet, you can find it on the official app store. Once the app is open, sign in to your Galxe ID account.
Step 2: Access Wallet Settings
After signing in to your Galxe ID account, navigate to the wallet settings. This can usually be found in the account tab or in the settings menu, depending on the version of the Galxe ID app you are using. Look for an option that says “Wallets” or “Manage Wallets.”
Step 3: Add Secondary EVM Wallet
In the wallet settings, you will see a list of your current wallets. To add a secondary EVM wallet, tap on the “Add Wallet” or “+ Wallet” button. A new window will open with options for adding a new wallet.
Step 4: Select EVM Network
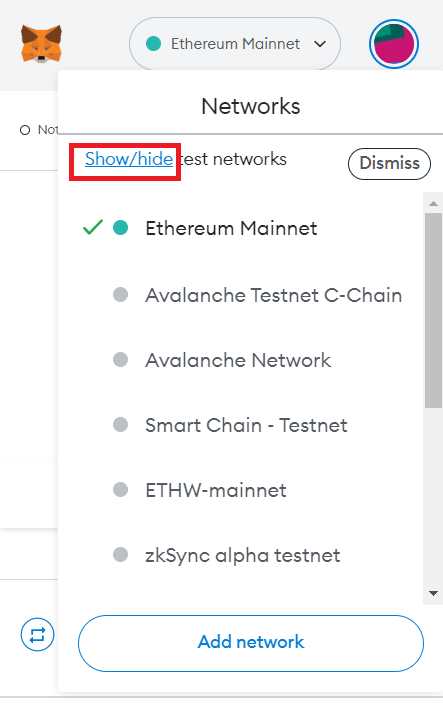
In the new wallet window, you will be prompted to choose the EVM network for your secondary wallet. This can be Ethereum (ETH) or any other compatible EVM-based network. Select the desired network from the list.
Step 5: Choose Wallet Type
After selecting the EVM network, you will need to choose the type of wallet you want to add. You can either create a new wallet or import an existing one. If you choose to import an existing wallet, you will need to enter the wallet’s seed phrase or private key.
Step 6: Set Wallet Name and Password
Once you have selected the wallet type, you will be asked to set a name for your secondary wallet. Choose a unique and descriptive name that will help you easily identify it. Additionally, set a strong password for your wallet to ensure its security.
Step 7: Confirm and Add Wallet
Before adding the secondary EVM wallet, double-check all the details you have entered. Make sure the EVM network, wallet type, name, and password are all correct. If everything looks good, tap on the “Confirm” or “Add Wallet” button to complete the process.
Congratulations! You have successfully added a secondary EVM wallet through Galxe ID. You can now conveniently access and manage multiple wallets from a single interface. Make sure to keep your wallet information secure and regularly back up your wallet data to avoid any potential loss.
Understanding Galxe ID and its Benefits
Galxe ID is a unique identifier that allows users to securely create and manage multiple EVM wallets on the Galxe network.
What is Galxe ID?

Galxe ID is a decentralized identity management system built on top of the Galxe blockchain. It provides users with a way to create and manage multiple EVM wallets using a single identity. Each Galxe ID is unique and can be used across different applications and services on the Galxe network.
Benefits of Galxe ID
There are several benefits of using Galxe ID:
- Security: Galxe ID uses blockchain technology to ensure the highest level of security for user identities and wallets. With Galxe ID, users have full control over their private keys and can securely access their wallets without relying on third-party services.
- Convenience: With Galxe ID, users can easily create and manage multiple EVM wallets using a single identity. This eliminates the need to remember multiple wallet addresses and private keys.
- Interoperability: Galxe ID is designed to be compatible with different applications and services on the Galxe network. Users can seamlessly use their Galxe ID across multiple platforms, making it easier to navigate the Galxe ecosystem.
- Privacy: Galxe ID allows users to protect their privacy by providing them with the ability to control their personal information. Users can choose to share only the necessary information with applications and services, ensuring their data is not unnecessarily exposed.
Overall, Galxe ID provides a secure and convenient way for users to manage their EVM wallets on the Galxe network, while also ensuring privacy and interoperability.
Step-by-Step Guide to Adding a Secondary EVM Wallet
If you want to add a secondary EVM wallet to your Galxe ID, follow these step-by-step instructions:
- Open your Galxe ID dashboard and log in to your account.
- Click on the “Wallets” tab to access your wallet settings.
- In the “Add Wallet” section, select “EVM Wallet” from the available options.
- Enter a nickname for your secondary EVM wallet. This will help you easily identify and manage multiple wallets.
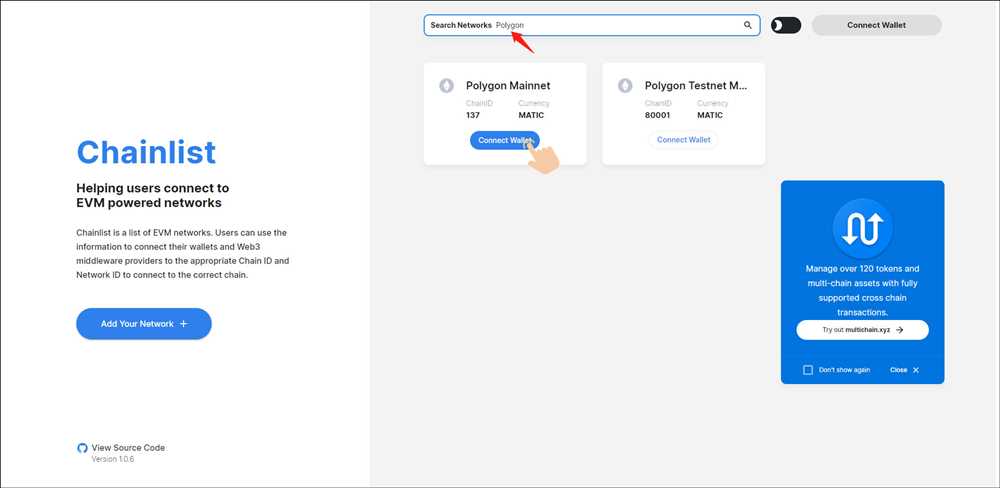
- Choose your preferred EVM network from the dropdown menu. You can select popular networks like Ethereum, Binance Smart Chain, or any other supported EVM network.
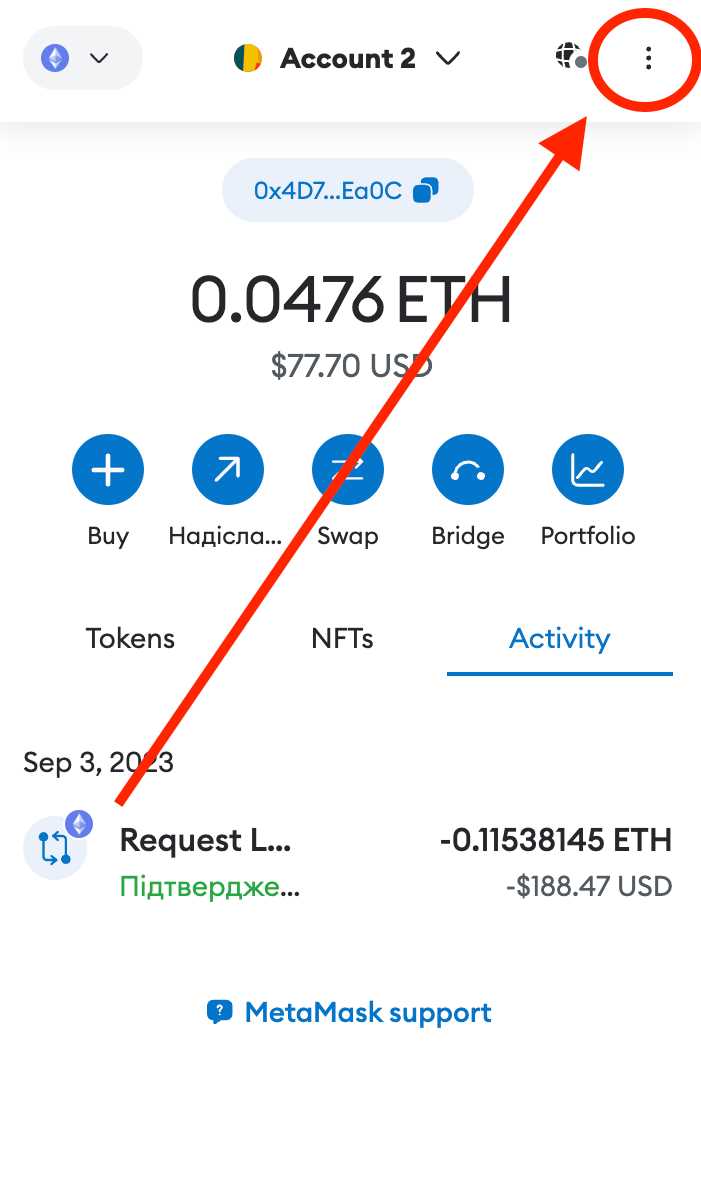
- Provide the necessary details to connect your wallet to the selected EVM network. This may include entering your wallet address, private key, or connecting through a wallet extension like MetaMask.
- Review the information you entered and ensure everything is correct.
- Click on the “Add Wallet” button to add your secondary EVM wallet to your Galxe ID.
- Wait for the confirmation message that your secondary EVM wallet has been successfully added.
- Congratulations! You have now added a secondary EVM wallet to your Galxe ID. You can easily switch between your primary and secondary wallets within the Galxe ID dashboard.
Having multiple EVM wallets connected to your Galxe ID allows you to manage different assets and participate in various EVM networks seamlessly. Make sure to keep your wallet details secure and never share your private keys with anyone.
Confirming and Using your Secondary EVM Wallet
Once you have successfully added a secondary EVM wallet through Galxe ID, it is important to confirm its activation and understand how to use it.
Confirming Activation
To confirm activation of your secondary EVM wallet, follow these steps:
- Open the Galxe ID app or website and log in to your account.
- Navigate to the wallet settings or account dashboard.
- Locate the section for secondary EVM wallets.
- Verify that your newly added wallet is listed and marked as activated.
If your secondary EVM wallet is not listed or marked as activated, you may need to repeat the steps for adding a secondary EVM wallet.
Using your Secondary EVM Wallet
Once your secondary EVM wallet is confirmed and activated, you can start using it for various purposes, such as:
- Sending and receiving EVM tokens
- Participating in decentralized finance (DeFi) applications
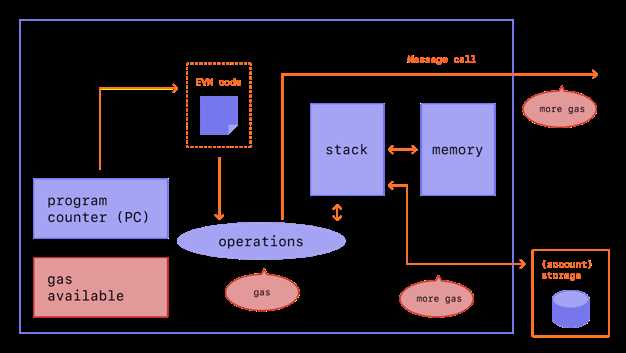
- Accessing and managing smart contracts
- Interacting with DApps (decentralized applications)
To use your secondary EVM wallet, follow these general steps:
- Access your secondary EVM wallet through the Galxe ID app or website.
- Select the desired transaction or action you want to perform.
- Provide any necessary details, such as recipient address or transaction amount.
- Confirm the transaction or action and follow any additional prompts.
Keep in mind that the specific steps and features may vary depending on the wallet interface and the applications you are using. It is always recommended to familiarize yourself with the wallet’s features and security measures to ensure the safe use of your secondary EVM wallet.
| Troubleshooting Tip: |
|---|
| If you encounter any issues or have questions about using your secondary EVM wallet, consult the Galxe ID documentation or contact their customer support for assistance. |
Do I need to download any additional software to add a secondary EVM wallet through Galxe ID?
No, you do not need to download any additional software to add a secondary EVM wallet through Galxe ID. The Galxe ID application has built-in support for creating and managing EVM wallets. Simply open the application and follow the steps outlined in the guide to add a secondary EVM wallet.